オープンソースのメルマガ配信システムphpListをインストールしてみる#1
今日はオープンソースのメルマガ配信システム「phpList」をインストールしてみます。
ダウンロードページはこちら
なお、今回インストールするのは最新のバージョン、3.0.12となります。
ダウンロードしたら、解凍しましょう。
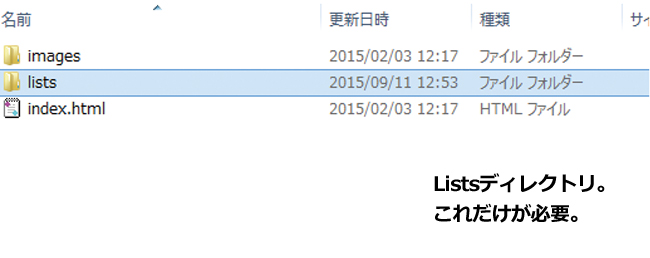
必要なのはPublic_html内のListsディレクトリだけです。
このディレクトリをまるっとアップロードしましょう。
WebサイトのURLがexample.comであれば、http://example.com/lists となるようにアップロードすればOKです。
listsディレクトリには、index.htmlとindex.phpが入っていますが、index.htmlの方は削除しておきます。
目次
データベースの作成
phpListはデータベースが必要になりますので、あらかじめ作っておきましょう。
データベース名やユーザー名、パスワードはこの後設定ファイルに書き込みますから、覚えておくか分かるようにしておいてください。
Configファイルの編集
Configファイル(設定ファイル)の編集を行います。
http://example.com/lists/config/config.php を編集します。
データベース名、データベースユーザー名、データベースパスワード、smtpサーバーを入力します。
[php]
<?php
/*
* ==============================================================================================================
*
*
* The minimum requirements to get phpList working are in this file.
* If you are interested in tweaking more options, check out the config_extended.php file
* or visit http://resources.phplist.com/system/config
*
* ** NOTE: To use options from config_extended.php, you need to copy them to this file **
*
==============================================================================================================
*/
# what is your Mysql database server hostname
$database_host = "localhost";
# what is the name of the database we are using
$database_name = "データベース名";
# what user has access to this database
$database_user = "データベースユーザー名";
# and what is the password to login to control the database
$database_password = ‘データベースパスワード’;
# if you have an SMTP server, set it here. Otherwise it will use the normal php mail() function
## if your SMTP server is called "smtp.mydomain.com" you enter this below like this:
##
## define("PHPMAILERHOST",’smtp.mydomain.com’);
define("PHPMAILERHOST",’smtpサーバー’);
# if test is true (not 0) it will not actually send ANY messages, but display what it would have sent
# this is here, to make sure you edited the config file and mails are not sent "accidentally"
# on unmanaged systems
define ("TEST",1);
[/php]
PHPListの管理画面にアクセスしてみる
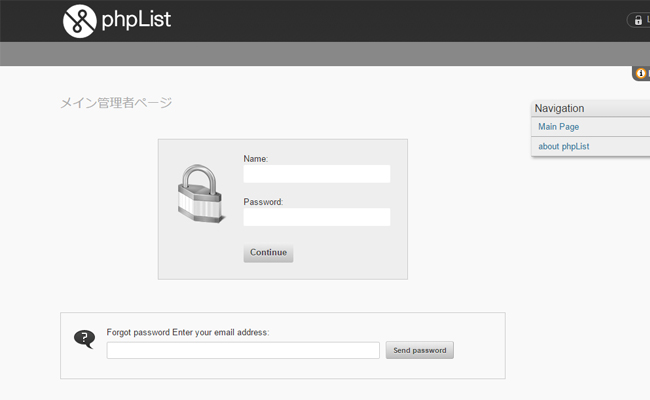
http://example.com/lists/admin/ にアクセスしてみましょう。
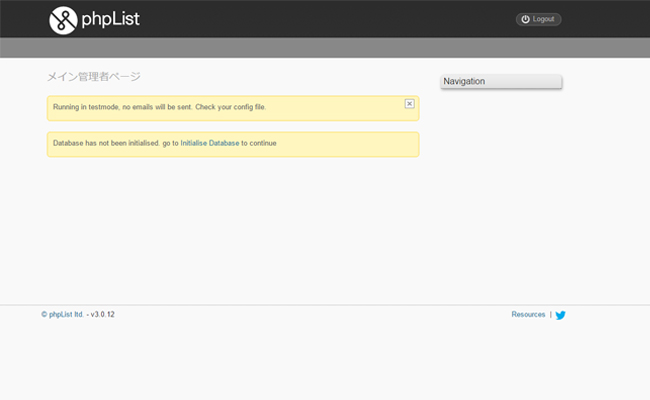
この画面になればOKです。
データベースの初期化が求められるので、Initialise Database のリンクをクリックしましょう。
システム言語の日本語化設定
ブラウザの設定が日本語になっていると、こんなエラーが出て怒られます。
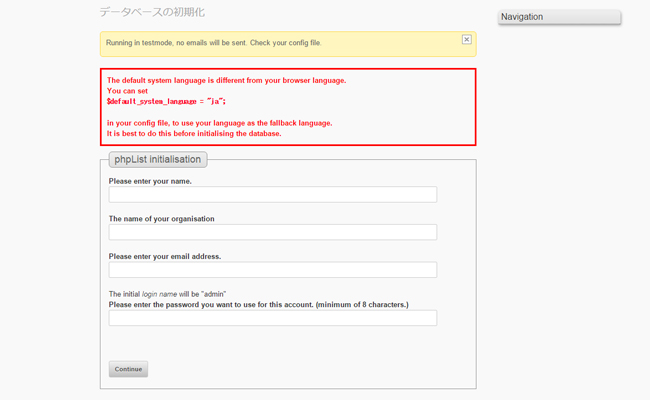
ブラウザ設定が日本語だから、システム言語も日本語に設定しておけよ!といった感じですね。
[php]$default_system_language = "ja";[/php]
をconfigファイルの一番最後の行にでも付け足しておいてください。
書き足したらブラウザを更新して、エラーが出ないことを確認します。
引き続き下のフォームに、自分の名前、組織名、メールアドレス、そして管理者パスワードを入力しましょう。
continue ボタンを押してください。
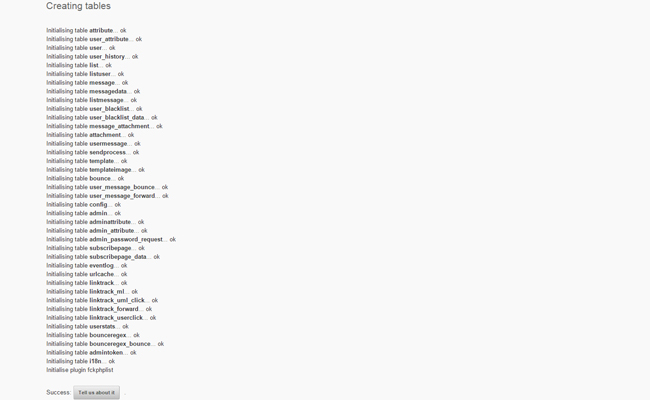
全部OKとなっていることを確認します。
再ログイン
いったんログアウトして、再度http://example.com/lists/admin/ にアクセスして再ログインします。
ユーザー名はadmin、パスワードは先程フォームで入力したパスワードになります。
こんな管理画面が表示されればインストールはひとまずOKです。
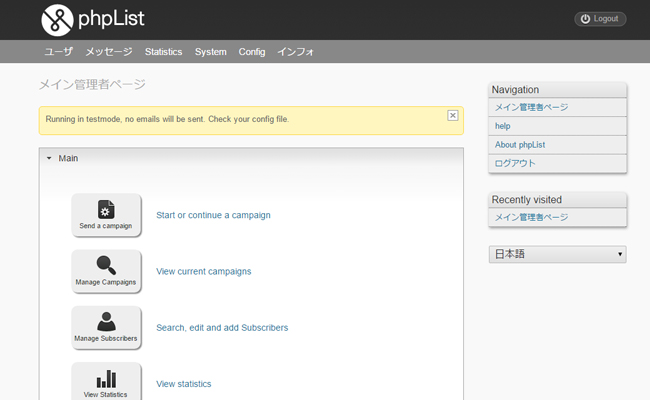
さて、今回はまだテストモードのままとなっており、メールの配信がなされない設定になっています。
この後各種設定を終えた時点でテストモードから本番モードに切り替えます。
次回はphpListの初期設定を行います。